Understanding the Critical Role of Engine and Transmission Mounts
Engine and transmission mounts are essential parts that bridge your vehicle’s powertrain to the frame or chassis. These critical parts serve dual purposes that directly impact your driving experience and vehicle safety. Before attempting any removal procedures, it’s crucial to understand their primary functions and how they affect your vehicle’s performance.
Primary Functions of Engine and Transmission Mounts
- Support and Stability: Secure the heavy engine and transmission in proper alignment with drivetrain parts including the driveshaft
- Vibration and Noise Isolation: Most crucial for ride comfort, absorbing constant vibrations generated by the running engine
- Prevent Direct Transfer: Stop vibrations and noise from transferring into the vehicle cabin for a smoother, quieter ride
Modern mounts typically use rubber, metal, or hydraulic fluid construction. The rubber or fluid acts as a cushion, dampening shocks naturally produced by engine operation. When these mounts fail, uncontrolled engine movement allows vibrations to transfer directly to the chassis, creating an uncomfortable driving experience.
Visual Identification of Failed Mounts
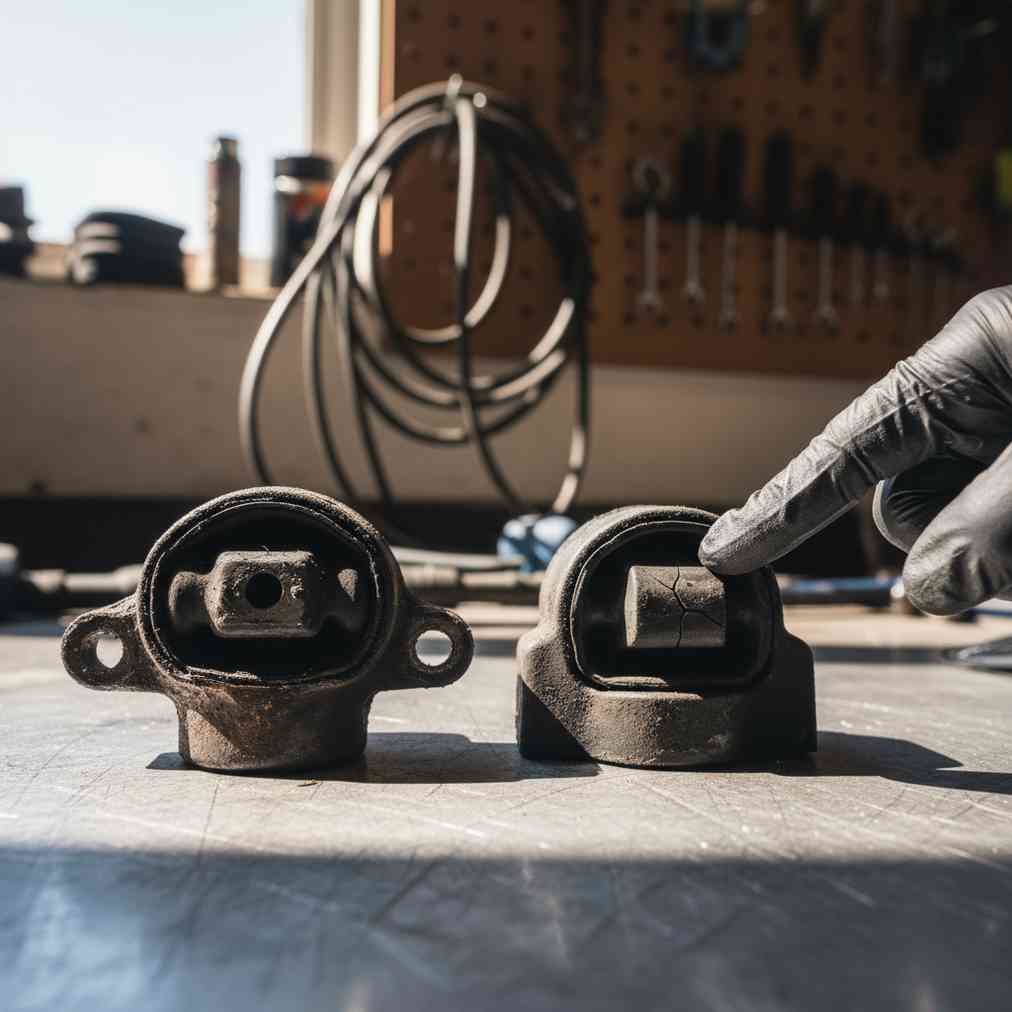
Before attempting to remove any mount, you’ll want to confirm failure through visual inspection. Failed mounts exhibit several telltale signs that are easily identifiable with proper knowledge. Learning proper inspection techniques can save you time and ensure you’re removing the correct parts.
Key Visual Indicators of Mount Failure
- Collapsed Rubber: Cracked, torn, or completely deteriorated rubber parts with possible metal-to-metal contact
- Visible Damage: Clear cracking or missing chunks from rubber portions
- Fluid Leaks: For hydraulic mounts, wetness or residue around the mount indicates internal failure
- Metal Bracket Misalignment: Off-center appearance suggesting engine or transmission movement
- Secondary Fluid Leaks: Transmission fluid leaks beneath the car due to excessive mount movement
Pre-Removal Inspection Checklist
A thorough inspection combining visual checks with physical tests confirms mount condition before removal attempts. This systematic approach prevents unnecessary work and ensures safety throughout the process. Many junkyards near me allow customers to inspect parts before removal, making this checklist valuable for salvage yard visits.
| Inspection Item | Description/Action | Indication of Failure |
|---|---|---|
| Visual Inspection (Rubber) | Look for cracks, tears, hardening, or missing pieces from rubber insulator | Visible physical damage, metal-to-metal contact |
| Visual Inspection (Hydraulic) | Check for fluid leakage signs around or on the mount | Wetness or residue indicating internal fluid loss |
| Visual Inspection (Metal) | Check metal brackets for corrosion, damage, and bolt tightness | Corrosion, loose bolts, off-center appearance |
| Engine Movement Test | Have assistant hold brake while shifting Park to Drive to Reverse with light revving | Excessive rocking or movement beyond slight movement |
| Pry Bar Test | With vehicle safely supported, gently test transmission mount for play | Mount moves too easily or separates from bracket |
Essential Tools and Safety Equipment
Proper preparation ensures safe and efficient mount removal. Having the right tools prevents delays and reduces injury risk during the removal process. Professional mechanics recommend specific tools for mount removal procedures.
Required Tools for Mount Removal
- Floor jack and jack stands: Never rely on jack alone for support
- Engine support bar or chain hoist: Essential for engine weight support
- Socket set and wrenches: Various sizes for different bolt configurations
- Pry bar: For separating stuck parts and leverage
- Penetrating oil: WD-40 or similar for rusted bolts
- Safety equipment: Gloves, safety glasses, and steel-toed boots
Safety Warning: Never attempt mount removal without proper engine support. The engine’s weight can cause serious injury or death if it falls unexpectedly.
Step-by-Step Engine Mount Removal Process
Engine mount removal requires systematic approach and careful attention to safety protocols. The process varies slightly depending on mount location and vehicle design, but fundamental steps remain consistent across most applications.
Preparation and Initial Setup
- Disconnect battery: Remove negative terminal to prevent electrical accidents
- Raise vehicle: Use proper lifting points and secure with jack stands
- Drain fluids if necessary: Some mounts require fluid system access
- Remove air intake parts: Clear access to upper mount bolts
- Install engine support: Use engine support bar or chain hoist before loosening any bolts
Mount Removal Procedure
- Locate all mounting bolts: Typically two sets – one to engine, one to frame
- Apply penetrating oil: Spray all bolts and allow 15-20 minutes for penetration
- Support engine weight: Ensure engine support is properly positioned and secure
- Remove upper bolts first: Start with engine-to-mount bolts
- Remove lower bolts: Frame-to-mount bolts come out last
- Extract the mount: May require gentle prying or rocking motion
During removal, pay close attention to bolt locations and orientations. Some mounts use different length bolts in specific positions, and proper reassembly depends on correct bolt placement.
Transmission Mount Removal Techniques
Transmission mounts present unique challenges due to their location and the transmission’s weight distribution. These mounts typically attach to the transmission tail housing and vehicle crossmember, requiring different support methods than engine mounts.
Transmission Mount Access and Support
- Locate transmission mount: Usually positioned under transmission tail housing
- Support transmission: Use transmission jack or floor jack with wood block
- Check crossmember bolts: Some designs require crossmember removal for mount access
- Inspect exhaust clearance: Exhaust system may interfere with mount removal
Removal Steps for Transmission Mounts
- Position transmission jack: Center jack under transmission oil pan with protective wood block
- Raise transmission slightly: Just enough to relieve weight from mount
- Remove crossmember bolts: If crossmember removal is necessary
- Extract mount bolts: Remove transmission-to-mount and mount-to-crossmember bolts
- Lower transmission carefully: Allow controlled descent while removing mount
Common Challenges and Solutions
Mount removal often presents unexpected challenges that can frustrate even experienced mechanics. Understanding common problems and their solutions prevents delays and reduces the risk of damage to surrounding parts.
Dealing with Seized or Rusted Bolts
- Heat application: Carefully apply heat with torch, avoiding rubber parts and fuel lines
- Impact tools: Use impact wrench for stubborn bolts, but avoid over-torquing
- Bolt extraction: Drill out severely damaged bolts as last resort
- Thread repair: Use thread repair kits for damaged mounting points
Access and Clearance Issues
Limited access often complicates mount removal, particularly in crowded engine bays. Advanced removal techniques can help overcome these obstacles without damaging surrounding parts.
- Remove interfering parts: Air intake, cooling fans, or splash shields may need temporary removal
- Use universal joints: Allow socket access in tight spaces
- Work from multiple angles: Access bolts from top and bottom when possible
- Mark part positions: Document part locations for proper reassembly
Safety Considerations and Best Practices
Mount removal involves significant safety risks due to heavy parts and potential for sudden movement. Following established safety protocols prevents injuries and ensures successful completion of the removal process.
Critical Safety Protocols
- Never work under unsupported engine: Always use proper engine support before removing mounts
- Check support integrity: Verify all support equipment is rated for engine weight
- Maintain clean workspace: Keep tools organized and work area free from trip hazards
- Use proper lifting techniques: Mounts can be surprisingly heavy, lift with legs not back
- Wear protective equipment: Safety glasses, gloves, and appropriate clothing are essential
Professional Tip: Always have a helper available when removing mounts. Two people can safely manage the process and respond to emergencies more effectively than working alone.
Evaluating Used Mounts at Salvage Yards
When sourcing replacement mounts from salvage yards, careful evaluation ensures you get parts that will provide reliable service. Not all used mounts are suitable for reuse, and proper inspection techniques help identify quality parts.
Inspection Criteria for Used Mounts
| Part Condition | Acceptable | Reject |
|---|---|---|
| Rubber Condition | Slight surface cracking, firm texture | Deep cracks, soft/mushy texture, missing pieces |
| Metal Brackets | Surface rust, solid structure | Structural cracks, severe corrosion, bent brackets |
| Hydraulic Mounts | No visible leaks, proper fluid level | Any signs of fluid leakage or empty reservoir |
| Bolt Holes | Round, proper thread engagement | Elongated holes, damaged threads, wallowed out |
When purchasing used mounts, verify compatibility with your specific vehicle year, make, model, and engine configuration. Mount designs can vary significantly even within the same model year due to different engine options or manufacturing changes.
Special Considerations for Different Vehicle Types
Different vehicle categories present unique challenges during mount removal. Understanding these variations helps prepare for specific requirements and prevents surprises during the removal process.
Front-Wheel Drive Vehicles
- Transverse engine layout: Mounts positioned differently than longitudinal engines
- CV axle interference: May require axle disconnection for mount access
- Subframe considerations: Some mounts attach to removable subframes
- Torque struts: Additional engine restraint systems common in FWD applications
Truck and SUV Applications
- Higher ground clearance: Better access from below but may require taller jack stands
- Frame-mounted designs: Typically more robust mounting points than unibody vehicles
- Transfer case mounts: 4WD vehicles have additional mount locations
- Heavy-duty construction: Larger bolts and more robust mounting hardware
Environmental and Legal Considerations
Proper disposal of removed mounts and associated fluids ensures environmental compliance and legal operation. Many jurisdictions have specific requirements for handling automotive fluids and rubber parts.
Proper Disposal Methods
- Hydraulic fluid: Recycle at automotive fluid collection centers
- Rubber parts: Many recycling centers accept automotive rubber
- Metal brackets: Separate steel and aluminum for scrap metal recycling
- Contaminated parts: Parts soaked in oil require special disposal procedures
If you have a vehicle with failed mounts that isn’t worth repairing, consider getting an instant quote for junk car removal rather than attempting repairs that might exceed the vehicle’s value.
Cost Considerations and Budget Planning
Understanding the full cost implications helps make informed decisions about mount removal and replacement. Costs vary significantly depending on vehicle type, mount location, and whether you’re doing the work yourself or hiring professionals.
Typical Cost Breakdown
- Used mount cost: $15-75 depending on vehicle and mount type
- Core charges: Some salvage yards charge refundable core fees
- Tool rental: Engine support equipment rental if you don’t own tools
- Professional removal: $150-400 labor if hiring a mechanic
- Associated repairs: Additional parts that may need replacement during the process
Conclusion and Final Recommendations
Successfully removing used engine and transmission mounts requires careful preparation, proper tools, and strict adherence to safety protocols. The systematic approach outlined in this guide ensures safe removal while maximizing the chances of obtaining quality replacement parts.
Remember that mount removal is intermediate-level automotive work that requires mechanical aptitude and proper safety equipment. When in doubt, consult with professional mechanics or research additional methods before proceeding with removal attempts.
Whether sourcing parts from salvage yards or removing mounts from your own vehicle, the inspection techniques and removal procedures covered in this guide will help ensure successful completion of your project while maintaining safety throughout the process.


Leave a Reply
You must be logged in to post a comment.